
How to edit your Realtour Marketing Materials
- Jun 16, 2016
- 3 min read
Editing your Realtour marketing materials is easy, as long as you understand the proper steps to take. Here is an overview of how to make your edits.Just scroll down to find the tool you are using.
To edit any of your materials, simply click the icon for the appropriate tool.

Editing Virtual Tours
If you need to make edits to your heading, price, address or listing details for your virtual tour, all of these changes can be made on the Property Details tab. To get there:
Log onto your account
Click the Virtual Tour icon on your dashboard
Click Edit on the tour you need to edit
Click the Property Details tab and make your edits
Any other changes such as to branding, music or captions can be made by clicking on the respective tabs.
The Property Details tab allows you to make edits to your listing information, price and heading.
All changes will automatically be updated regardless of where you have posted your virtual tour.
Eflyers & Print Materials
Once you have saved and/or sent an eflyer and print materials all edits must be made on the Edit Template tab. This includes changes to your head shots, logos and contact information. To get there:
Log onto your account
Click the Eflyer or Print Materials icon on your dashboard
For both print materials and eflyers that have not been sent or downloaded yet, you will see a window that shows listings with and without the marketing materials in question. Click edit for the listing:

For eflyers it can get a little more complicated at this point as you might see this window first if you have already sent a version of the eflyer:

If you do see this window make sure that you are selecting the correct version as it is a very common mistake to choose the wrong one. Click Edit to get to the Edit Template tab.
Again, be certain you are clicking edit on the correct version from the correct box.
Tip: If you have many versions of an eflyer it is always a good idea to discard any that you do not need or that are incorrect by clicking Delete under the Options menu. Again, if doing so be certain you are selecting the correct version as once deleted it cannot be retrieved.
Once you click Edit, it will take you directly to the Edit Template tab. The Edit Template tab allows you to edit all text boxes, upload new images, replace images, edit and add subject lines, add links and social media using the Editing Panel as shown here:

For images, you can upload new ones by clicking Images on the editing panel and then the upload images button on the photos tab. You can also select an image already uploaded by clicking and dragging it over to the image box. This will automatically replace the image for you.
Although you can upload new head shots and logos as well as update your contact information under My Account, once you have started, sent or paid for print materials or eflyers you have to update your branding on the edit tab. To upload new head shots and logos you can click the head shot or, logo tab to upload new images and then drag them into place over the existing head shot or logo. (For instructions on how to update branding information for auto population on all new marketing materials click here.)

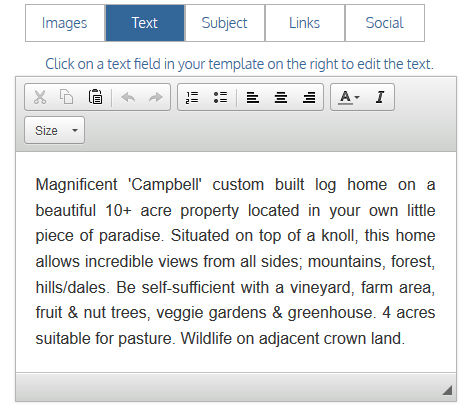
To edit text boxes, including your contact information simply click the text box and the text editor box will appear on the left as shown here:
For eflyers, be certain to check your subject line on the Subject tab.

You can then add or remove links by clicking the links tab as shown here. Just highlight a link you wish to edit, or click add a new link to add links. Click the X to delete a link.

Social media links can be added on the Social tab, but are also automatically added if you have saved social media links under My Account. You can delete any auto populated links by deselecting the dot.

Permanent Branding Updates
You can also follow the instructions here to add new contact info, head shots and logos for permanent changes to your branding using the My Account option on your main navigation. This will then auto populate any marketing materials you make moving forward with your updated branding and contact information.
Make Edits on all Marketing Materials
Remember that if you have your virtual tour posted publicly you will have to make changes to the tour as well. Changes made to an eflyer or your print materials will not automatically make a change to your Property Details for your virtual tours.
Realtour offers free tutorials to help you learn the quickest ways to use our tools. We also provide online chats and even have a Virtual Assistant to build your materials for you.


Comments